

In With The New - A Geopackage Poke
01 Jun 2018SCT Part 1
Scrapping For Data
The City of Capetown has a great and searchable place where data on and about the city is shared openly. The data is currently being migrated to a Portal for ArcGIS site which will bring with it a wealth of features and functionality. For now (June 2018), I am happy with the ‘simple’ site. This post is about collating spatially formatted data on the City of CapeTown. (Well, as provided on the open-data portal.)
So to start out I got city-wide base data from the Open Data Portal site and any apparently interesting themes, storing it locally for easy reach. The data was in compressed zip files, excel spreadsheets, pdfs and ODS files. I just dumped these, after some processing, in one folder. Fortunately there was sanity to the file naming from source.
Creating a Geodatabase
I went with GeoPackage for data storage/file format. So I could learn more about it and also because I have been hearing about it more often. Recently from FOSS4GNA 2018. I used primarily Q, QGIS and other tools I will mention. Here’s the step by step:
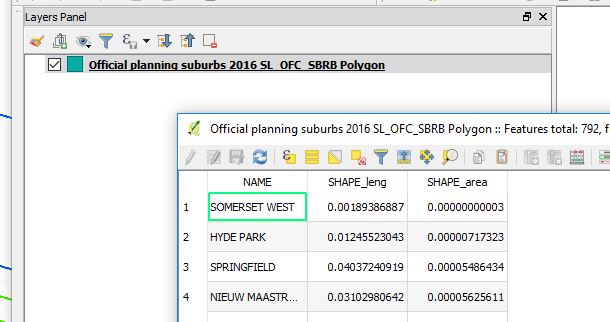
1. From the Open Data Portal, search and download the suburbs spatial data. This is available in zipped shapefile format.
2. Load the official planning suburbs data (zipped) shapefile in Q. The CRS(Coordinate Reference System) in Q set to ESPG:4326,
3. Right click on the suburbs layer, then Save As…leads to a dialog box of format choice and other options. Choose GeoPackage for a format.
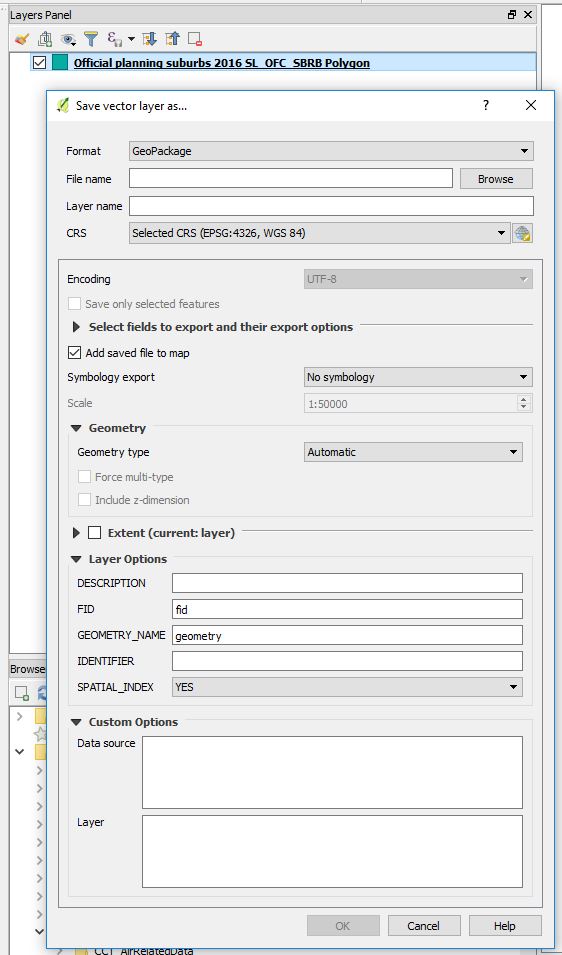
- Select FileName and browse to the appropriate location. Enter the Geopackage Name (cct_opendata.gpkg).
-
Edit Layer name (suburbs). (Taking out the original Planning and Official to reduce characters in the layer name). CRS Auto populates to EPSG:4326, WGS84.
-
(Encoding is Grayed out at UTF-8 which is okay. we chose this when we loaded the suburbs shapefile).
-
Expanding the “Select fields to export and their export options”. Tick off SHAPE_leng and SHAPE_area. (Area and Length are not really useful especially when using a Geographic Coordinate System. Additionally, these where values calculated in the original gis software the data was exported from so we drop them to avoid confusing ourselves when using this data in our new geodatabase we are building.)
-
Keep “Add saved file to map”. (So we will be able to see if our export went well).
- There is no Symbology to export so skip that part. (We have not done any styling to our data yet which we would want to keep.)
On “Geometry”, Q has it as Automatic. (Q will correctly interpret this as polygon which it truly is.)
On “Extent”, Choose layer. Which defines the bounds of City of Capetown .(Well, I have prior knowledge of this. Local context data)
Layer Options:
Q has a tooltip for these fields. So hovering a mouse gives a hint what a field is for.)
- DESCRIPTION: set to “Official Planning Suburbs”
- FID:fid (Kept as is. Means Feature IDentity we infer.)
- GEOMETRY NAME: geom (Shortened from geometry. A matter of preference from previous experience. Conveniently short when writing out SQL statements.)
- IDENTIFIER: Suburbs
- SPATIAL _INDEX: YES (This helps in speeding things up when doing queries and spatial stuff with this layer.)
Custom Options:
Conveniently, the data from the Open Data Portal comes with some metadata. So we use that to populate these fields. Better build a comprehensive database from the ground up for future usage’s sake.
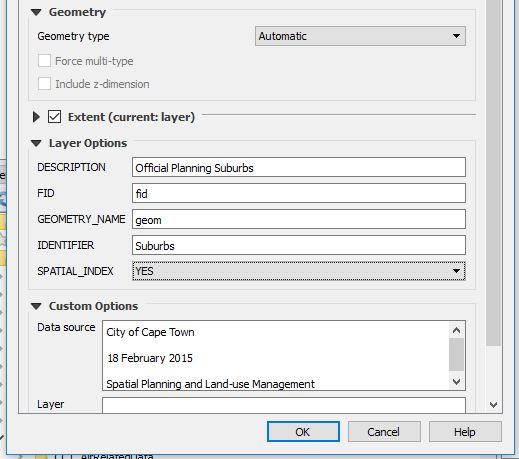
On OK.Q loads the GeoPackage and subsequently the layer. Q has made the export MultiPolygon and not just Polygon. (We will investigate this later.)
Our Geodata, The GeoPackage
To see what we just did. In Q, Load Vector data. Point to the GeoPackage (cct_opendata.gpkg ) and Voila! Our Suburbs data ‘geopackaged’ and with only two fields “fid” and “NAME”.
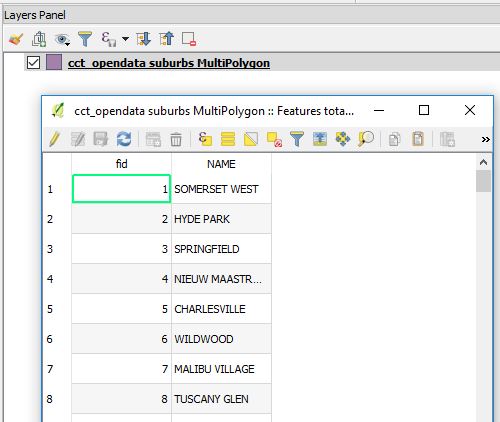
(From previous database fiddle experience, something about the “NAME” field in CAPS bothers me. We’ll deal with it late if need be.)
To take a peek into our GeoPackage Launch DB Manager from Q.
-
From Menu –> Database –>DB Manager –>DB Manager
-
Right Click on GeoPackage.–>New Connection. Point to the GeoPackage (cct_opendata). A connection is added and therein is the suburbs layer we just added.

From here there is a plethora (I could be exaggerating) of GeoPackage versions. So lets’s investigate which version we just created so we know in case of eventualities as we build our datastore. We get a tip from here on how we can check a geopackage version.
With the GeoPackage opened in DB Manager.
- Launch the SQL Window (Database – >SQL Window).
- Then type
PRAGMA user_version;then Run (F5) the query.

User_version ‘0’ is not very indicative.
- Run the following query in stead
PRAGMA application_id;then Run (F5) the query.
We get a better results. Let’s interpret ‘1196437808’. from this guide we learn “1196437808 (the 32-bit integer value of 0x47503130 or GP10 in ASCII) for GPKG 1.0 or 1.1”
So our geopackage version is atleast 1.0.
While we are still at the SQL Interface. Let’s interrogate our ‘suburbs’ data.
How many suburbs are in our table?
SELECT Count(fid) FROM suburbs,
792 suburbs!
Fiddle
“A GeoPackage is a platform-independent SQLite [5] database file that contains GeoPackage data and metadata tables.” Source. From this we infer that we should be able to explore the GeoPackage somemore with DB Manager as a SpatiaLite database.
- Right Click SpatialLite icon —>New Connection, then point to cct_opendata.gpkg. Expanding it reveals the contents.
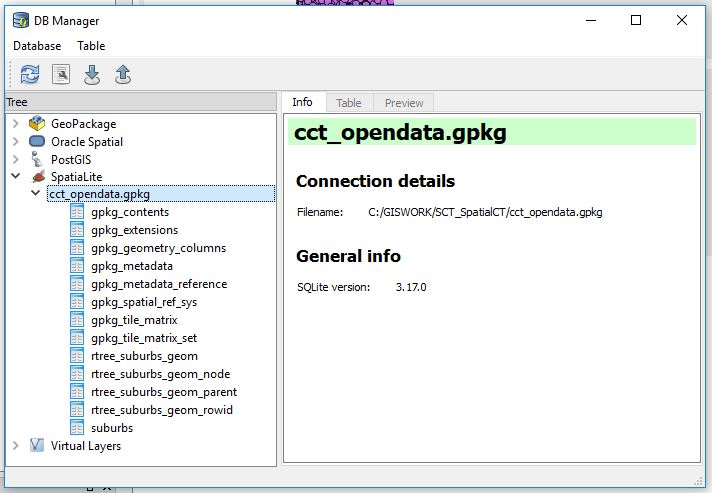
More about those fields is explained here. Not for the faint hearted. Gladly we can just point Q at the geopackage and get our layer(s) to display!
Stacking The Store
To add more data to the GeoPackage. Repeat the procedure described in Creating a GeoDatabase above.
So I went on to load several layers form the Open Data Portal. After several clicks, some typing and 1.5Gigs later, 22 spatial data layers! (These were pseudo-randomly selected. No particular preference just a hunch that the data may help answer a question yet unknown.)
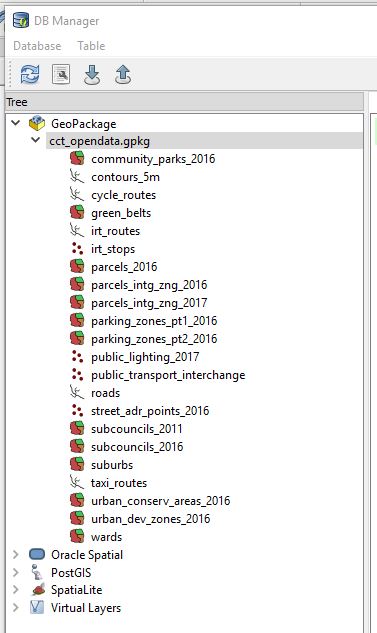
So while scrolling through the data (in Q via DB Manager),I noticed a triangle warning one of the layers did not have a spatial index. I opted to create one as prompted by Q. Q did it behind the scenes I simply had to click a hyperlink.
Using the SQLite Database Browser, we can get more insight into the GeoPackage.
#PostScript
While browsing to the geopackage location. I couldn’t help noticing two extra files
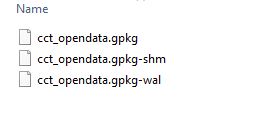
I found out these are temprary files used by SQLite. For a moment I thought the multi-file legacy of the Shapefile was back.
- wal - Write-ahead Log File –*“the purpose of the WAL file is to implement atomic commit and rollback”**
- shm - Shared memory file – *“The only purpose of the shared-memory file is to provide a block of shared memory for use by multiple processes all accessing the same database in WAL mode.”**
I used:
- QGIS 2.18 (DB Manager)
- DB Browser for SQLite 3.10.1
- SublimeText 3.1.1
Refs:
1. FOSS4GNA 2018 Geopackage Presentation